Difference between revisions of "Zentyal"
From Blue-IT.org Wiki
(.) |
|||
| Line 59: | Line 59: | ||
There choose the services you like. It is always good, of possible to to a snapshot after each of this steps and test, if everything went ok! | There choose the services you like. It is always good, of possible to to a snapshot after each of this steps and test, if everything went ok! | ||
| − | |||
| − | |||
| − | |||
| − | |||
| − | |||
== Firewall == | == Firewall == | ||
| Line 72: | Line 67: | ||
In case you forget this you can temporaryly disable the firewall via commandline and alter this settings. | In case you forget this you can temporaryly disable the firewall via commandline and alter this settings. | ||
/etc/init.d/zentyal firewall stop | /etc/init.d/zentyal firewall stop | ||
| + | |||
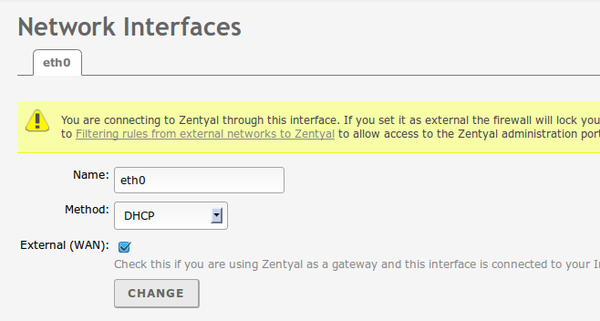
| + | == Network == | ||
| + | Be sure to enable the WAN switch. | ||
| + | |||
| + | [[File:20131006 Zentyal Network 1.png|600px]] | ||
== Mail == | == Mail == | ||
Revision as of 18:14, 6 October 2013
Contents
[hide]Zentyal - the small business server for Linux
- http://wiki.ubuntuusers.de/Zentyal
- http://wiki.ubuntuusers.de/Zentyal/PPA-Installation
- http://ubuntuserverguide.com/2012/11/how-to-instal-zentyal-3-0-on-ubuntu-server-12-04-lts.html
Base installation on ubuntu 12.04 LTS
We are startigng with a bare ubuntu system with only ssh enabled.
First of all please update all packages and do some configurations:
vim /etc/apt/sources.list
Uncomment the following line:
deb http://archive.canonical.com/ubuntu precise partner
We install the apt-add-repository-script to be able to use the zentyal repository afterwards and do a full system upgrade:
apt-get install -y python-software-properties
apt-add-repository ppa:zentyal/3.0
apt-get update
apt-get dist-upgrade
apt-get clean
Then add an administrative account for zentyal.
To be able to access the webinterface you have setup an administrativ user which belongs to the admin group. This is NOT the ubuntu adm group! You have to create the group first:
groupadd admin
useradd myAdmin
passwd myAdmin
usermod -G admin -a myAdmin
...
Pleas verify, that the newly created user is part of the new group with:
su my Admin
groups
Finally reboot the system:
reboot
Install Zentyal
The base system then will be install via the command
apt-get -y install zentyal
This will install all prerequisites. Please prepare to have:
- the or a mysql root password
- the port for the webinterface
I suggest 444 for the webinterface, so it would not be in conflict with https-pages on your site (you can then access the webinterface via http://vserver:444).
Configure the services
You will now be able to access the webinterface via http://vserver:444.
There choose the services you like. It is always good, of possible to to a snapshot after each of this steps and test, if everything went ok!
Firewall
IMPORTANT: Alter your firewall settings to enable the Zentyal administration !!!
Otherwise you won't be able to access the webinterface.
In case you forget this you can temporaryly disable the firewall via commandline and alter this settings.
/etc/init.d/zentyal firewall stop
Network
Be sure to enable the WAN switch.
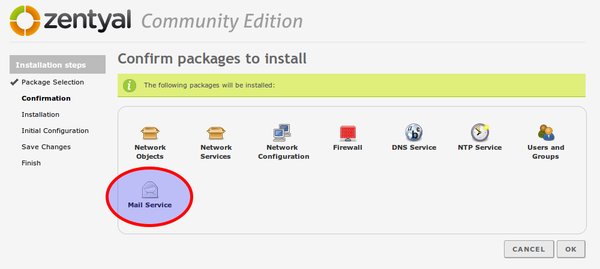
First of all we like to install an e-mail-system. This is what most users want, when they install zentyal on an vserver.
If you only choose the mail plugin, several plugins will be installed, too:
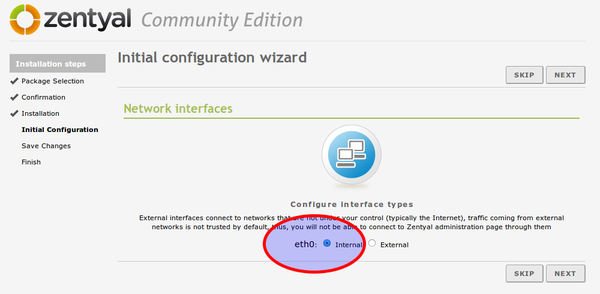
In the next steps, it is important that you
- choose eth0 as interface (see picture) and later
- DHCP for the configuration of eth0.
- Directly afterwards you will be asked for the Kerberos REALM. Please use the domain name of your server, if configured. If not SKIP this step for now!
Changing the REALM
Sometimes it can be necessary to alter the realm (kerberos). This will brake all user related modules and forces them to reinstall:
/usr/share/zentyal-users/reinstall
- Then klick on the "Ally"-Button on the upper right corner of the web-interface.
- Then go to "Users" -> "Mode...", change the realm and apply.
- Then you have to reenable the "Users"-module and apply the changes.
- Then you can also reenable the "Samba"-module and apply the changes.


