Zentyal
From Blue-IT.org Wiki
Contents
- 1 Zentyal - the small business server for Linux
Zentyal - the small business server for Linux
- http://wiki.ubuntuusers.de/Zentyal
- http://wiki.ubuntuusers.de/Zentyal/PPA-Installation
- http://ubuntuserverguide.com/2012/11/how-to-instal-zentyal-3-0-on-ubuntu-server-12-04-lts.html
Installation and Upgrading to Ubuntu 14.04 LTS
Unfortunately Zentyal changed it's release policy DRAMATICALLY since Version 3.4 (3.5) - I cannot find other words.
Be very carful Ubuntu 12.04 LTS Zentyal installation. You will probably loose a lot of functionality!
Read carfully and check the new requirements at: http://www.zentyal.org/zentyal-release-policy
That said, the facts boild down that you loose:
- Zarafa (!) - and thereby your mail configuration an installation which ist WORST!
- Webserver configuration - you have to manage it manually. This is not very dramatic.
- Be aware and prepared of apache2.4 versus apache 2.2 config changes (which mainly you can read about in Webserver#Apache_2.4).
- Rolling Release - that means updating Zentyal almost ever need updating the server to a new Ubuntu version which could probably lead to strange side effects for other mission critical systems (database server, programming language environments like ruby) ...
New is:
- Openchange support - which is very PROMISING
A personal comment on this
As far as I can say, this was very annoying on the first place. I cost me almost a week to recover a system, when updating a 12.04 server, which in case lead to an update on Ubuntu 13.04 which was not intended!
But, after doing a lot of updates on my zentyal installations and reading about the facts, I can agree with the decission of Zentyal going this way. They are getting rid of parts, which can be dealed easily whith native system tools. They focus on networking (firewall), gateway, office and open change as an exchange server replacement. I think, this is a good way - however no easy way for users of the commiunity version of zentyal.
Trouble when uninstalling or reinstalling an old zentyal installation
- ALWAYS only install one module per time, configure it correctly and then head on!
- Backup your zentyal settings
Possible use cases:
1. Database was accidentilly dropped and zentyal-core could not be uninstalled with the postinstallation script. So create an empty one ;-)
mysql> create database zentyal;
2. See - if you installed zentyal - that no process is running using ebox:
> ps x | grep ebox
22871 ?        Ss     0:00 sudo -u ebox /usr/bin/redis-server /var/lib/zentyal/conf/redis.conf
3. A postinstallation script of zentyal-core ist not working, so zentyal-core is never installed:
- Simply run the script standalone
> /var/lib/dpkg/info/zentyal-core.postinst
and check for errors!
- Deactivate the script:
vim /var/lib/dpkg/info/zentyal-core.postinst
#!/bin/bash
exit 0

set -e
[...]
- re-run dpkg
dpkg --configure -a
- continue with the web interface, which should be run now!
service zentyal webadmin restart
4. Is the mysql password set?
vim /var/lib/zentyal/conf/zentyal-mysql.passwd
Base installation on ubuntu 12.04 LTS
We are startigng with a bare ubuntu system with only ssh enabled.
First of all please update all packages and do some configurations:
vim /etc/apt/sources.list
Uncomment the following line:
deb http://archive.canonical.com/ubuntu precise partner
We install the apt-add-repository-script to be able to use the zentyal repository afterwards and do a full system upgrade:
apt-get install -y python-software-properties
apt-add-repository ppa:zentyal/3.2 # PUT THE ACTUAL VERSION NUMBER HERE!
apt-get update
apt-get dist-upgrade
apt-get clean
Then add an administrative account for zentyal.
To be able to access the webinterface you have setup an administrativ user which belongs to the admin group. This is NOT the ubuntu adm group! You have to create the group first:
groupadd admin
useradd myAdmin
passwd myAdmin
usermod -G admin -a myAdmin
...
Pleas verify, that the newly created user is part of the new group with:
su my Admin
groups
Finally reboot the system:
reboot
Install Zentyal
The base system then will be install via the command
apt-get -y install zentyal
This will install all prerequisites. Please prepare to have:
- the or a mysql root password
- the port for the webinterface
I suggest 444 for the webinterface, so it would not be in conflict with https-pages on your site (you can then access the webinterface via http://vserver:444).
Configure the services
You will now be able to access the webinterface via http://vserver:444.
There choose the services you like. It is always good, of possible to to a snapshot after each of this steps and test, if everything went ok!
Firewall
IMPORTANT: Alter your firewall settings to enable the Zentyal administration !!!
Otherwise you won't be able to access the webinterface.
In case you forget this you can temporaryly disable the firewall via commandline and alter this settings.
/etc/init.d/zentyal firewall stop
Using hooks
When the firewall module of Zentyal is restarted, all iptable-rules (see NAT) will be reset. So it is wise to use the zentyal hook system to reset the desired rules! A detailed explanation you'll find here: Zentyal#Customization
LDAP port changed on Zentyal 3.2
By default LDAP uses the port 389. The problem is, that samba4 - which is part of Zentyal 3.2 - already uses this port.
For that reason LDAP on Zentyal 3.x is running on port 390. This is not documented on the first sight, and in the firewall, the "LDAP" is assigned to prot 389.
Solution:
- add a custom port 390 and name it e.g. LDAP-Zentyal
- open the port in the firewall for the internal network traffice (or outside, which is NOT wise)
Test with. Replace <ZENTYAL-SERVER-IP> with the IP of your LDAP-server
ldapsearch -x -p 390 -LLL -h <ZENTYAL-SERVER-IP> -b "" -s base "(objectclass=*)" supportedSASLMechanisms
Radius
#/bin/bash
#
# Put this in /etc/rc.local
#
# Monitor zentyal radius

# Upon update, links for freeradius will be set again, so remove them
update-rc.d -f freeradius remove

restart_radius() {
     /usr/sbin/service zentyal radius stop
     sleep 2
     /usr/bin/killall freeradius

     /usr/sbin/service zentyal radius start
}

while (true)
do
       if radtest radtestuser 123-qwe localhost 1812 123-qwe
       then
               echo "RADIUS OK"

       else
               logger "ERROR: ZENTYAL RADIUS is DOWN ... restarting ..."
               restart_radius
       fi

       sleep 15

done
LDAP
[Update] --Apos (talk) 11:06, 2 November 2013 (CET)
Redmine
This is tested with Zentyal 3.2 on Ubuntu 12.04 LTS and Redmine 2.3.3-2 (via ppa). ! Be aware and read the section LDAP port changed on Zentyal 3.2 !
On the users and group-page in the zentyal administration page there are the credentials you need to get readonly access to LDAP.

LDAP Settings
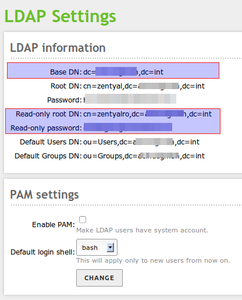
Zentyal LDAP credentials


LDAP credentials in zentyal:
Basedomain (Base DN): dc=your_domain,dc=your_tld
Rootdomain (Root DN): 	cn=zentyal,dc=your_domain,dc=your_tld
Password: 	        <admin_secret_pass>
Read-only root DN: 	cn=zentyalro,dc=your_domain,dc=your_tld
Read-only password: <ro_secret_pass>
Default Users DN: 	ou=Users,dc=your_domain,dc=your_tld
Default Groups DN: 	ou=Groups,dc=your_domain,dc=your_tld
For testing, if you have the right credential, you can use e.g. the free and opensource JXplorer or the commandline:
Check if, the server accepts incoming port
telnet <IP_OF_LDAP_SERVER> 390
ldapsearch -x -p 390 -b "<Basedomain (Base DN)>" -h <IP_OF_LDAP_SERVER> \
-D "<Read-only root DN>" -w "<Read-only password>"
Figured that out, you can e.g. use LDAP in Redmine like this:
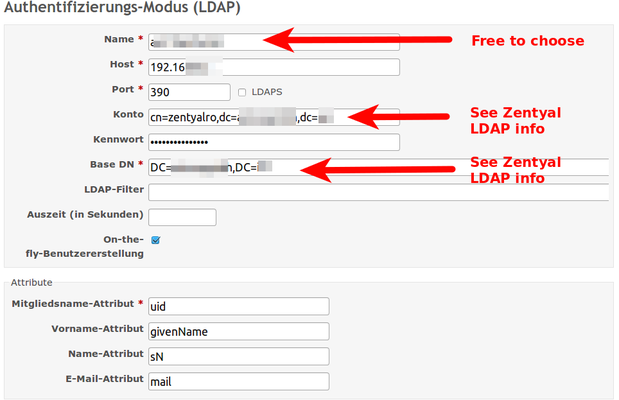
Redmine LDAP settings

Owncloud
See Owncloud#Owncloud.2C_LDAP_and_Zentyal.
Network
Zentyal completely cares for the network on your ubuntu server.
Therefore you should - but do not have to - disable the network-manager:
sudo service network-manager stop
Create an override file for the upstart job:
echo "manual" | sudo tee /etc/init/network-manager.override
Then configure your network cards with zentyal and be sure to enable the WAN switch, if you are using zentyal on an internetserver without a gateway in front of it, that is, if your server ip is an internet ip address:

First of all we like to install an e-mail-system. This is what most users want, when they install zentyal on an vserver.
If you only choose the mail plugin, several plugins will be installed, too:

In the next steps, it is important that you
- choose eth0 as interface (see picture) and later
- DHCP for the configuration of eth0.
- Directly afterwards you will be asked for the Kerberos REALM. Please use the domain name of your server, if configured. If not SKIP this step for now!

Virtualisation module moved
Like advised here ...
... some of the modules - especially the virtualisation module - have moved to a so called contribution section.
- [...]
- Moreover, as announced in the Forum, the following modules have been moved to the contrib repositories in order to live
- up to our motto of being an easy-to-use Linux small business server:
- * PPTP
- * Virtualization
- * Thin clients
- * VoIP
- [...]
A solution can be found here:
Customization
A Zentyal system can be adopted to your own needs in a very easy way: using hooks!
Every service on a Linux system is configured in its own configuration file. Mostly living in /etc/.... Zentyal stores the setting of all services in so called "stubs". These templates can be overridden using hooks.
But using hooks make the system more complex. This means: when doing updates of your zentyal system, you have to be careful and integrate actual changes of zentyal's stub into your own hook. Your own hooks are not updated automatically as well.
How this is done:
- Youtube Zentyal channel
- Zentyal Summit 2011 - How to Customize Zentyal
- Zentyal Summit 2011 - Five easy hacks to customize Zentyal
Also see the section Zentyal#Firewall.
Samba4 - changing the REALM
Sometimes it can be necessary to alter the realm (kerberos). This will brake all user related modules and forces them to reinstall:
/usr/share/zentyal-users/reinstall
- Then klick on the "Ally"-Button on the upper right corner of the web-interface.
- Then go to "Users" -> "Mode...", change the realm and apply.
- Then you have to reenable the "Users"-module and apply the changes.
- Then you can also reenable the "Samba"-module and apply the changes.
see: http://trac.zentyal.org/ticket/5695
Monitoring Services
Apache
With e.g. monit: see Server_Monitoring#Zentyal_Apache2.
Radius
There seems to be a problem with freeradius and Zentyal 3.4.
update-alternatives -f freeradius remove
vim ~/bin/monitor_zentyal_radius
# !/bin/bash

# Monitor radius

restart_radius() {
      /usr/sbin/service zentyal radius stop
      sleep 2
      /usr/bin/killall freeradius

      /usr/sbin/service zentyal radius start
}

while (true)
do
       if radtest radtestuser 123-qwe localhost 1812 123-qwe
       then
               echo "RADIUS OK"

       else
               logger "ERROR: ZENTYAL RADIUS is DOWN ... restarting ..."
               restart_radius
       fi

       sleep 15

done